
This page explains how Creativio AI 2.0 works in real usage, from uploading your first image to generating professional visuals and marketing content.
If you’re new, start with the main overview here:
👉 Creativio AI 2.0 Review
For pricing and plans, visit:
👉 Creativio AI 2.0 Pricing
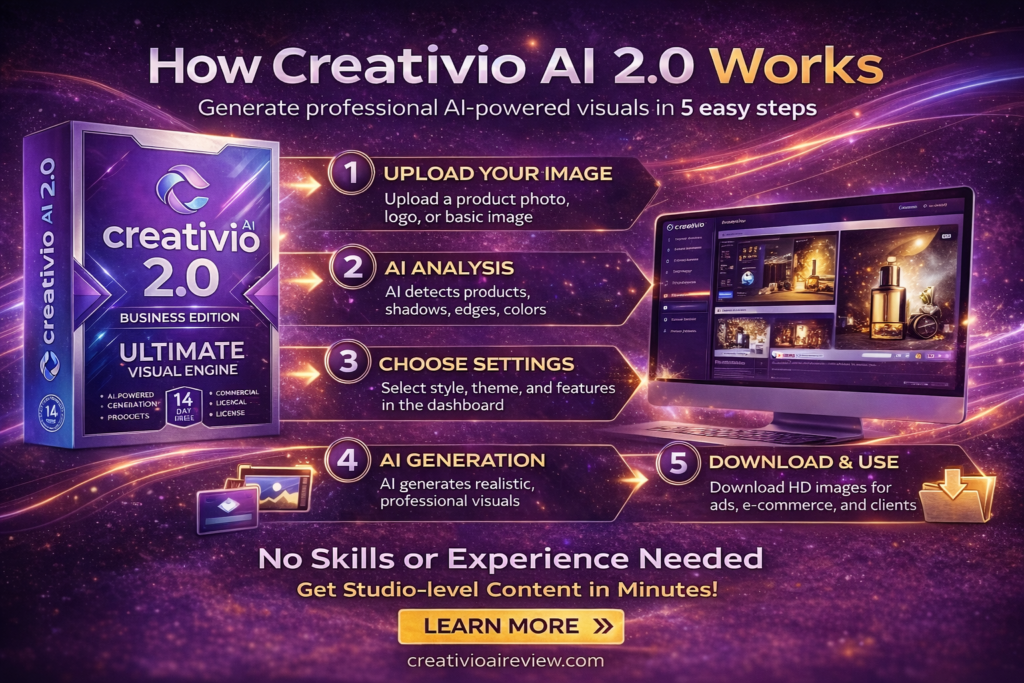
How Does Creativio AI 2.0 Actually Work?
Creativio AI 2.0 works as a cloud-based AI visual engine. You don’t install anything. Everything runs inside your browser.
The entire workflow can be broken into four simple steps.
Step 1: Upload Your Image
You start by uploading:
- A product image
- A logo
- Or any basic photo
This can be:
- A supplier image
- A mobile phone photo
- A raw product shot
Even low-quality images can be used, although clearer images always produce better results.
Step 2: AI Analysis
Once uploaded, Creativio’s AI analyzes your image.
It automatically detects:
- Object shape
- Edges and depth
- Lighting and shadows
- Background elements
- Color composition
Behind the scenes, the platform uses computer vision and GPT-4 based prompt systems to understand what the image represents and how it can be improved.
You don’t need to configure anything manually.
Step 3: Choose What You Want to Create
Next, you choose how you want the final visual to look.
You can select:
- Background style
- Scene type
- Visual theme
- Aspect ratio (1:1, 9:16, 16:9)
- Image style (luxury, modern, lifestyle, etc.)
You can also describe what you want in simple English, such as:
“Premium skincare bottle on marble table with golden lighting”
The AI converts this into a professional visual automatically.
Step 4: AI Generation
Creativio AI then:
- Removes the background
- Generates new environments
- Adjusts lighting and reflections
- Enhances colors and sharpness
- Creates multiple variations
You can generate up to 4 image variations at once, making it easy to test different looks quickly.
Step 5: Download and Use
Finally, you download your images.
You get:
- High-definition files
- No watermarks
- Commercial usage rights
You can use them for:
- Product pages
- Ads
- Social media
- Landing pages
- Client projects
How the PRO Version Changes the Workflow
With the PRO upgrade, the process becomes even more powerful.
You unlock:
- Unlimited generations
- 4K Ultra-HD quality
- Full Magic Tools library
- Faster processing
This is ideal for:
- Running large campaigns
- Managing multiple stores
- Serving clients
How the Animation Studio Works
With the Animation Studio upgrade, the same workflow extends to video.
Instead of downloading static images, you can:
- Turn images into animated videos
- Create product reels
- Generate ad loops
- Export in 9:16, 1:1, and 16:9 formats
This removes the need for:
- Video editors
- After Effects
- Complicated timelines
How the Agency System Works
With the Agency license, you can:
- Add team members
- Manage clients inside a CRM
- Sell product photography services
- White-label your visuals
Creativio becomes not just a tool, but a full AI-powered service business platform.
Why This Workflow Is So Powerful
The reason Creativio AI 2.0 works so well is because it removes:
- Technical complexity
- Manual design work
- Expensive software
- Outsourcing delays
And replaces it with:
- Automation
- Speed
- Scalability
- Consistent quality
You can go from a raw image to professional visuals in minutes.
Final Thoughts on How Creativio AI 2.0 Works
Creativio AI 2.0 is built around one simple idea:
Make professional visual creation accessible to anyone, without skills or equipment.
The workflow is:
Upload → Describe → Generate → Download.
That’s it.